[xml]
[/xml]
文件类型过滤规则添加.html|.swf|.php。
[xml]
[/xml]
文件类型过滤规则添加.html|.swf|.php。
[php]
// 当前时间,并修正8小时问题
‘value’ => date(‘Y-m-d H:i:s’, time()+8*60*60),
[/php]
[php]
‘value’ => rand(100, 500),
[/php]
在zend_framework中的Zend_File组建可以对文件进行上传,改组建可以对上传了的文件的大小,图片的尺寸,每次上传文件的个 数,上传文件的后缀(类型)进行定义.可以对上传之后的文件名进行修改。
html代码如下:
[html]
[/html]
Action中的代码为:
[php]
$upload = new Zend_File_Transfer_Adapter_Http();
//设置上传之后文件的目录
$upload->setDestination(‘../public/up’);
$upload->addValidator(‘Extension’,false,’gif,jpeg,png,jpg’) //设置上传文件的后缀名
->addValidator(‘Count’,false,array(‘min’=>1,’max’=>5)) //设置上传文件的个数
->addValidator(‘ImageSize’,false,array(‘minwidth’=>0, //设置上传图片的大小
‘maxwidth’=>1300,
‘minhight’=>0,
‘maxhight’=>1300))
->addValidator(‘FilesSize’,false,array(‘min’=>’10KB’,’max’=>’1024KB’) //设置上传文件的大小
);
//添加过滤器来修改上传文件的名称
//$upload->addFilter(‘Rename’,array(‘target’=>’images/123.gif’,’overwrite’=>true));
//print_r($upload->getFileInfo());
// echo ‘
————-
‘;
$fileInfo = $upload->getFileInfo();
foreach ( $fileInfo as $file=>$info ){
if( $upload->isValid($file) ){
echo $file.’
‘;
$upload->addFilter(‘Rename’,array(‘target’=>time().mb_convert_encoding($info[‘name’],’gbk’,’utf-8′),’overwrite’=>true),$file);
$upload->receive($file);
header(“Location: ../public/”);
}else{
//对不能上传的文件的错误信息进行处理
print_r($upload->getMessages());//得到错误信息
}
}
[/php]
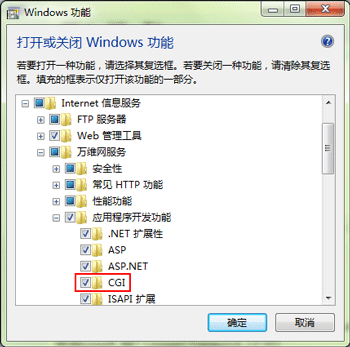
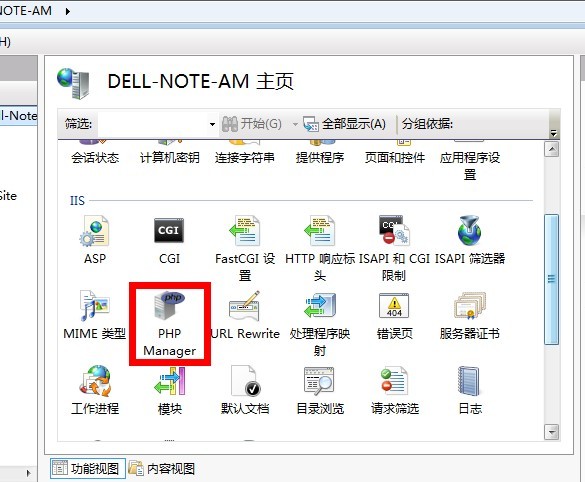
运行Zend Framework + IIS7.5组合需要添加IIS组件支持URL Rewriting。
1、Zend Framework http://www.zendframework.com/download/latest;
2、URL Rewrite Module http://www.iis.net/expand/URLRewrite;
新建本地站点,配置好处理程序映射、默认文档、目录浏览,然后下载URL Rewrite Module后直接安装即可,打开IIS后可以发现安装成功,如附件。
点击“”Import Rules”,拷贝以下规则到“Rewrite Rule”
[php]
RewriteCond %{REQUEST_FILENAME} !-f
RewriteRule ^.*$ index.php [NC,L]
[/php]
点击“应用”,OK。
注意,这里的导入不支持官方提供的规则。
本配置经本地测试运行ZF后正常运行。
然后,解压到C:\PHP5.3.5中就可以了
将php.ini-development改名为php.ini
修改php.ini 查找data.timezone 修改为date.timezone = “Asia/Shanghai”(这里必须改,不然会出警告)
找到Windows Extensions开启 所需模块,如:php_curl.dll php_mysql.dll php_mysqli.dll php_xmlrpc.dll php_curl.dll 只要去掉前面的 分号 保存就可以了
最后核验一下吧,仍在这个界面上,可以点一下“Check phpinfo()”;然后无意外的情况下会弹出令人激动的PHPInfo页面了!
直接使用end($array)就可以取到最后一个值,可以使用php的指针函数
[php]
$list = array(‘a’, ‘b’, ‘c’);
foreach($list as $k=>$v) {
if($v != end($list)) {
// 不是最后一项
} else {
// 最后一项
[/php]
以前没做过webservice,现在项目需要,只好边学边做,还好有google大神和baidu大哥帮助。
zf的框架很牛,做webservice基本不用动脑
只用到zend_soap包中的Zend_Soap_Server,Zend_Soap_AutoDiscover和Zend_Soap_Client三个类
首先要注意ZF是调用php的soap扩展,所以请确认php.ini(;extension=php_soap.dll 去掉分号)中打开了soap扩展,同时注意配置php.ini中soap段的wsdl缓存,调试时请关闭该缓存,否则
修改model后无法查看效果。发布时可以把缓存打开。还有就是使用服务器套件的问题,我试过使用APMServ5.2.6,完全正确的代码,就是使用
Zend_Soap_Client时无法获取服务端提供的服务函数,最后改用wapmserver又没有问题,哎。。。
基本流程就是使用使用Zend_Soap_Server,Zend_Soap_AutoDiscover构建服务端,然后使用Zend_Soap_Client来调用服务端提供的功能
基本代码
(1)服务端,先建立controller
/modules/services/controllers/WapSearchControllers.php
[php]
setClass(‘WapArticle’);
$autodiscover->handle();
}
private function handleSOAP() {
$soap = new Zend_Soap_Server($this->_WSDL_URI);
$soap->setClass(‘WapArticle’);
$soap->handle();
}
//不需要视图和layout,所以禁用之
public function init(){
$this->_helper->viewRenderer->setNoRender();
$this->_helper->layout()->disableLayout();
}
public function indexAction(){
//判断请求中是否有wsdl有就自动生成wsdl的uri否则启动soap服务
if(isset($_GET[‘wsdl’])) {
$this->handleWSDL();
} else {
$this->handleSOAP();
}
}
//客户端测试
public function clientAction(){
$client = new Zend_Soap_Client($this->_WSDL_URI);
//调用服务端提供的服务
$res = $client->getArticle(31);
var_dump($res);
}
}
[/php]
需要特别说明的是,这里的setClass成员函数传入的业务逻辑类名称一定要和下面的业务逻辑类名称一致,不然会报非法控制器错误
建完controllers该建model了
//业务逻辑所在层,把所有需要提供的服务都可以放在这一层中
/modules/services/models/models/WapArticle.php
[php]
getArticle($id);
//这里可以把结果进行xml格式化或者json格式化,以方便其他客户端调用
$d = json_encode($s);
return $d;
}
/**
* Simple array sort
*
* @param Array $array
* @return Array
*/
public function simple_sort($array) {
asort($array);
return $array;
}
/**
* Adds method
*
* @param Int $param1
* @param Int $param2
* @return Int
*/
public function math_addx($param1, $param2) {
return $param1+$param2;
}
}
?>
[/php]
这里要特别说明的是:
我曾尝试让WapArticle类直接继承Zend_Db_Table_Abstract类,然后再在WapArticle类中直接对数据库表操作,没有成功,报出非法控制器错误,不知
如何解决,google了一下,好像网上也有类似的问题,不知是ZF本身的问题,还是说我没写对,有哪位大神路过的话,还望给指点一二
然后我又尝试使用Zend_Registry::get(‘db’)获取数据库连接对象,也是为空,又失败,正当我一筹莫展时,突然想起尝试一下在该类中直接实例化一
个原来的的数据库表操作类试试(modules/news/models/FrontDbTable/Article.php),没想到还真成功了。不知道这个问题出在哪里!不过这样也好
。把这个层单独独立出来,只处理业务逻辑,数据库操作在另外一个层实现,倒实现了分离的目的,嘿嘿,算是无心插柳吧。
还有就是业务逻辑层的成员函数说明格式要注意,不然好像还会报出非法控制器错误(哎,啥都报这个错误,还让人活不。。。)
[php]
/**
* Adds method
*
* @param Int $param1
* @param Int $param2
* @return Int
*/
public function math_addx($param1, $param2) {
return $param1+$param2;
}
[/php]
函数名称说明与函数参数说中间有一行空格
输入要采用”@param 参数类型 参数名”的格式
输入要采用”@return 参数类型”的格式
顺便也贴上/modules/news/models/FrontDbTable/Article.php的代码
[php]
class News_Model_FrontDbTable_Article extends Zend_Db_Table_Abstract
{
protected $_name = ‘custom_article’;
public function getArticle($id)
{
$id = (int)$id;
$where = array(‘id=’.$id, ‘isshow=1’);
$row = $this->fetchRow($where);
if(!$row){
return 0;
}
return $row->toArray();
}
}
[/php]
下面就是如何使用了
有三个地址
http://192.168.1.100/kktapp/public/services/wapsearch/index?wsdl显示该server的wsdl,uri其中对服务做了详细描述包括服务名称,服务的类
型,输入输出参数等
而http://192.168.1.100/kktapp/public/services/wapsearch/index则可查看服务是否正常运行
一般出现如下界面就说明服务正常运行
[xml]
–
–
–
[/xml]
http://192.168.1.100/kktapp/public/services/wapsearch/client则是客户端测试,当然也可以使用其他客户端(如java,.net等)进行测试
这里只测试了一个服务getArticle($id),数据库用户配置正确的话,应该返回一个json格式的数组
—————————————————————————–
用java写了客户端,测试了一下,还行能调用
使用到了axis1.4代码如下
[java]
import org.apache.axis.client.Call;
import org.apache.axis.client.Service;
public class Testserver {
public static void main(String[] args) {
try {
String endpoint = “http://192.168.1.100/kktapp/public/services/wapsearch/index”;
Service service = new Service();
Call call = (Call) service.createCall();
call.setTargetEndpointAddress(endpoint);
call.setOperationName(“getArticle”);
int temp = 31;
String result = (String) call.invoke(new Object[] { temp });
System.out.println(“result is ” + result);
}
catch (Exception e) {
System.err.println(e.toString());
}
}
}
[/java]
分类: Php, ZEND FRAMEWORK(ZF)
目前ecshop的密码加密方式是:
[php]
md5(md5($password).$ec_salt)
[/php]
其中$ec_salt是表中的ec_salt字段。
在团队开发中,离开不开版本控制工具,比如TFS,SVN,CSV等,小型团队可以选用SVN,最近在开发PHP项目,由于几个人一块开发,于是再次用上了SVN,用zend studio 连接SVN。
步骤如下:
1.在线安装SVN客户端
地址:Eclipse update site URL: http://subclipse.tigris.org/update_1.6.x

2.项目签入到SVN服务器
注:图片顺序为操作顺序


One of the things I’m always looking for is ways to improve performance with the applications I write. While a few applications are write-heavy, most are read-heavy: that is, reading the database is the predominant behavior (for example, this WordPress blog reads the database far more often than it writes to the database). Additionally, Zend Framework is (comparatively) slow at handling requests, offering a throughput of about 67 requests per second on my machine, while loading static pages came in at a whopping 750 requests per second.*
So, given this performance difference, how do we improve the performance of Zend Framework while still retaining its functionality and ease-of-use? Well, we employ caching, of course!
But not just any caching. One of the beauties of a read-heavy website, especially one that doesn’t change all that often, is that we have the ability to cache entire pages and serve them directly using our web server. In Zend Framework 1.10.0, Zend_Cache_Frontend_Capture and Zend_Cache_Backend_Static were introduced, giving us the ability to take entire pages produced by Zend Framework and cache them. This means that we get the ability to use Zend Framework and all of its framework-y goodness, while still having the ability to enjoy the performance of static HTML pages served by our webserver. Excellent.
When devising my proof of concept, however, I found that implementing these components is more difficult than it looks. This is in part because the documentation is lacking, and also in part that the documentation in some spots is wrong. But after a week of searching and a journey that consisted of reading a Jira ticket, filing one of my own, dealing with imperfect documentation, asking questions in #zftalk on Freenode, bugging Matthew Weier O’Phinney to the point where I’m sure he made a voodoo doll of me, bugging Pádraic Brady about the cache, and good old-fashioned trial and error, I’ve mastered the implementation of static whole-page caching in Zend Framework, and here is a tutorial of how to do it yourself.
Standard Disclaimer
This tutorial implements code found in the latest version of Zend Framework at the time it was written. That means Zend Framework 1.10.3. Future releases of Zend Framework may, from time to time, change the behavior of components discussed here. Any changes should be reviewed in the documentation.
Additionally, where caching is concerned, it’s never a good idea to cache authenticated pages. It’s also never a good idea to cache data that changes a lot. Finally, it’s never a good idea to cache pages that change based on inputs, like pages that you access via POST or PUT requests.
Getting Started
First things first: let’s talk a little bit about Zend Framework’s caching model and how Zend_Cache_Frontend_Capture and Zend_Cache_Backend_Static are different.
With most Zend caches, you can implement them using the factory() method – in fact, the documentation warns against doing it any other way. So, to implement a frontend file cache using an APC backend, you can do the following:
[php]
Zend_Cache::factory(‘File’, ‘APC’, $frontOps, $backOps);
[/php]
With the implementation of the Zend_Cache_Manager in 1.10, you can register your cache with the manager, and then access it directly from your controllers. However, if you try to implement the Zend_Cache_Frontend_Capture or Zend_Cache_Backend_Static caches in this fashion, it blows up entirely, and will ruin your day. This is because these caches (collectively known as the Static Cache) are designed to serve files directly from the webserver once the file is cached; this means two things in particular: first, the static cache’s ID is the request URI (which in turn is turned into hexadecimal to comply with Zend_Cache’s rules on IDs), and second, because in order to capture the data, the cache uses output buffering.
Therefore, implementation of the static cache is done through the application.ini file, as a resource plugin. Developers wishing to implement this cache must include the following lines in their application.ini files:
[php]
; Custom Caches (Adjustments To Default CacheManager)
resources.cacheManager.page.backend.options.public_dir = APPLICATION_PATH “/../public/cached”
resources.cacheManager.pagetag.backend.options.cache_dir = APPLICATION_PATH “/../data/cache/tags”
[/php]
This means that all of the cached data is stored in the public/cached directory; all the cache’s tags are stored in data/cache/tags. These paths are by no means the only paths, but you must specify a path for both in order for the cache to work properly.
Why do you need to specify a separate tags directory? Due to the fact that files are served directly off the web server, rather than through PHP, the tags are stored separately in another cache. This defaults to a file cache, and you must specify another location for the files to be stored. The static cache utilizes an internal cache which is transparent to you in every other way.
There is one additional INI setting we must employ. In order to operate properly, the static cache employs output buffering and captures that output, writing it to disk and then serving it to the end user. Zend Framework also employs output buffering, which if not turned off, will interfere with the static cache. This was a hangup for me, since it’s not mentioned anywhere, and was something I discovered quite by accident. In order to turn off Zend Framework’s standard output buffering, we need to include the following INI directive:
[php]
resources.frontController.params.disableOutputBuffering = true
[/php]
This directs the front controller to turn off output buffering, which allows the static cache to handle it.
The last thing we need to do is create the directories where the cache will store its files, and make them owned by the web server user. While the static cache will create its own directory to store the cached static files (if it doesn’t exist), the file cache will throw an exception.
At this point, the file cache is ready to go. It’s configured, we’ve created the directories, we’ve turned off output buffering, and we’re not ready to get into caching files.
Caching Output
Zend Framework now has a built in cache helper which we’ll use to cache our static content. This needs to be done in the init() method (from my tests), and should list all the actions on the page you want to cache. Your controller should look similar to this:
[php]
< ?php
class IndexController extends Zend_Controller_Action
{
public function init()
{
$this->_helper->cache(array(‘index’), array(‘indexaction’));
$this->_helper->cache(array(‘viewpage’), array(‘viewpageaction’));
}
public function indexAction()
{
}
public function viewpageAction()
{
}
public function logoutAction()
{
}
}
[/php]
The argument list for the cache plugin is simple: first, an array of the actions we’re caching, followed by an array of the tags associated with those actions. I’ve listed index and viewpage separately, with different tags, but you can tag multiple actions with the same tags, or break it out as I have. As you develop your application, you’ll want to be careful to not cache actions that are being executed on a POST request, which you can do by using the request object’s isPost() method. Also, in this example, logoutAction() is never cached; this is because we obviously don’t want to cache the results of a log out; we actually want PHP to unset the user’s identity.
Occasionally you may wish to invalidate the cache and remove old files. To do so, you search by tag. For this example, let’s purge the “indexaction” tagged files from the cache:
[php]
$this->_helper->getHelper(‘Cache’)
->removePagesTagged(array(‘indexaction’));
[/php]
The “indexaction” tagged pages will be invalidated and re-cached on the next request.
Directing Apache To Serve Cached Files
The whole point of this process is to serve the cached files at a significant performance improvement, so now we need to make some edits to our .htaccess file’s rewrite rules. The documentation’s rules are slightly incorrect, so let’s devise our own scheme.
My read-heavy sites are usually fairly simple, serving static HTML files rather than XML, OPML, or JSON. Therefore, I need only have a rule for HTML. Additionally, I want to make sure the web server only serves cached files on GET requests, so I’ll include a rewrite condition to help with that.
[php]
RewriteCond %{REQUEST_METHOD} GET
RewriteCond %{DOCUMENT_ROOT}/cached/index.html -f
RewriteRule ^/*$ cached/index.html [L]
RewriteCond %{REQUEST_METHOD} GET
RewriteCond %{DOCUMENT_ROOT}/cached/%{REQUEST_URI}\.html -f
RewriteRule .* cached/%{REQUEST_URI}\.html [L]
RewriteCond %{REQUEST_FILENAME} -s [OR]
RewriteCond %{REQUEST_FILENAME} -l [OR]
RewriteCond %{REQUEST_FILENAME} -d
RewriteRule ^.*$ – [NC,L]
RewriteRule ^.*$ index.php [NC,L]
[/php]
These rules do a few things: first, if the request goes to the index controller with no arguments (www.example.com/) then it tries to load the index.html cached file. Second, if there are arguments it tries to load the cached file based on the request URI. Finally, for anyone used to using Zend Framework, the last five lines are the same five lines we start with in our Zend Framework default project; these we leave alone to ensure that we run the application if there is nothing in our cache to serve.
Final Notes On Caching
Now that we’ve gotten the cache set up and verified that it works, we can develop our application. However, we obviously want to avoid caching during development, so we can turn caching off by adding the following to our [development : production] section of application.ini:
[php]
resources.cacheManager.page.backend.options.disable_caching = true
[/php]
And that’s it! We can now develop our application with full page caching, getting the performance of a static web server and the flexibility of Zend Framework in the same package.
Good luck!
* The benchmarks cited were performed in the following way: I used Apache Bench, with 3000 requests (none concurrently), to test a stock Zend Framework project, and a flat file of the stock index.php of a Zend Framework project. Both times the files were named with the PHP extension. I did not benchmark the performance of any Zend components. The tests were executed on the same server as the webserver. Apache was restarted after each test. As usual, the standard disclaimers apply and the point of these benchmarks is simply to illustrate a well-known fact: flat HTML files serve faster than parsed PHP code.
原文链接:http://www.brandonsavage.net/caching-for-efficiency-with-zend-framework/
路由是个过程,在这个过程中它取出URI的端点(跟着基本URL的URI的那部分)并把它分解成参数来决定哪个模块、哪个控制器和控制器中的哪个动作应该接受请求。模块、控制器、动作和其它参数被打包到Zend_Controller_Request_Http对象,接着这个对象由Zend_Controller_Dispatcher_Standard来处理。路由只发生一次:当请求最初被接收和第一个控制器被派遣之前。
一般地,更新配置文件比修改代码更方便。这个可能通过addConfig()方法来做。基本上,你创建一个Zend_Config-compatible配置,并在你的代码中读入然后传递给RewriteRouter。
本例中,使用INI文件进行路由器配置。下面为具体代码。
[php]
/*
* Bootstrap.php
*/
protected function _initRouter()
{
$router = Zend_Controller_Front::getInstance()->getRouter();
$config = new Zend_Config_Ini(APPLICATION_PATH.’/configs/route.ini’, ‘production’);
$router->addConfig($config, ‘routes’);
}
[/php]
[shell]
[production]
routes.archive.type = “Zend_Controller_Router_Route_Regex”
routes.archive.route = “archive/(\d+)”
routes.archive.defaults.controller = “archive”
routes.archive.defaults.action = “show”
routes.archive.map.1 = “year”
routes.archive.reverse = “archive/%d”
[/shell]
Zend Framework提供的路由器功能十分强大,设置起来非常灵活。对于路由器的各种用法,在Zend Framework参考手册中有非常详细的介绍,大家可以参看:
《标准路由器 – Zend Framework Manual》
[php]
// Controller中为Form传递值
public function ***Action()
{
$form = new Application_Form_Category(array(‘fid’=>1));
$this->view->form = $form;
}
[/php]
[php]
// Form中获得值
$this->getAttrib(‘fid’);
[/php]